
I can’t resist these candy cane cookies, with their cheerful red-and-white twists and sweet peppermint sparkle on every holiday cookie tray. They’re the festive little treat everyone reaches for first.
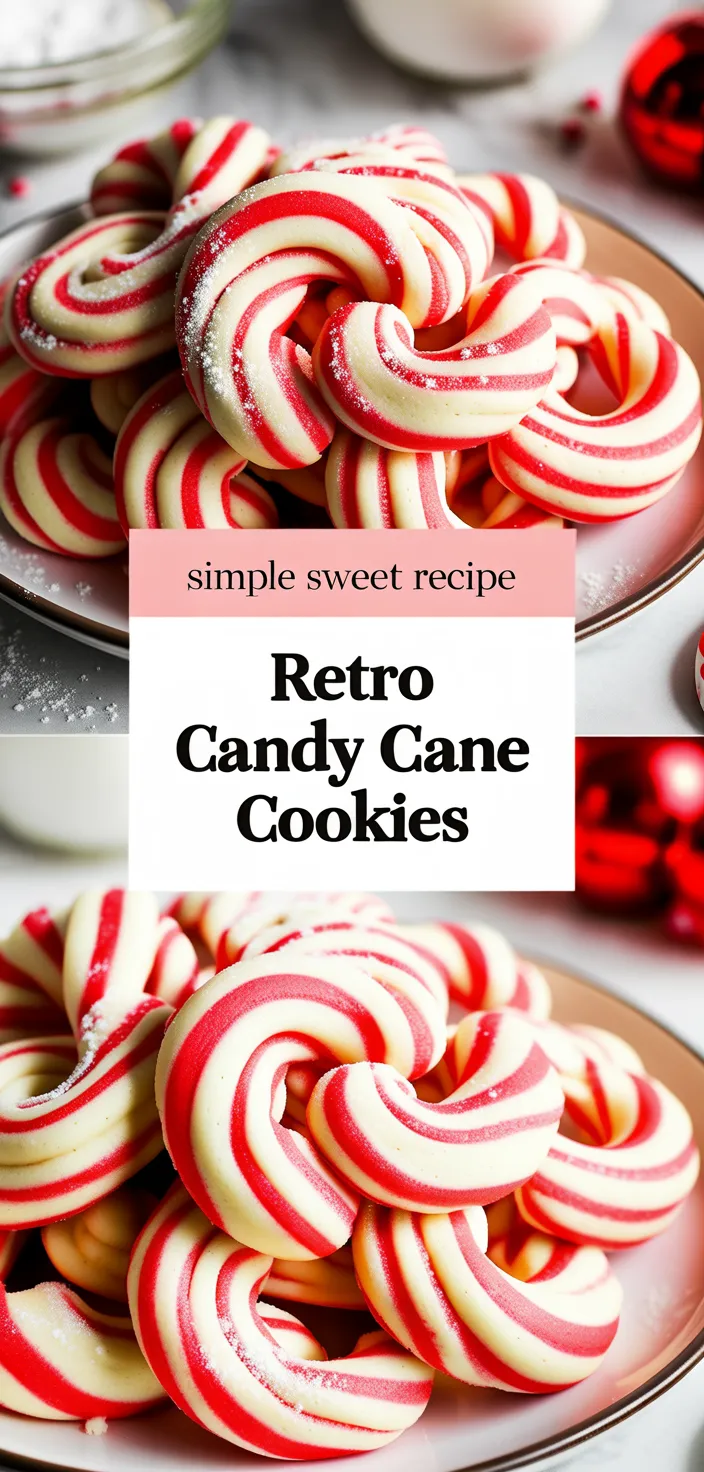
I’m obsessed with candy cane cookies because they look like something I’d swipe off a holiday dessert tray before dinner and pretend I didn’t. The red gel food coloring gives those twists their bold striped drama, and the peppermint extract brings that crisp, sweet bite that makes every nibble feel like Christmas without going full candy overload.
I love the buttery cookie texture, the snap of mint, the playful shape, the whole retro bakery vibe. And yes, I will absolutely pick the prettiest one first.
Then come back for the slightly wonky ones. Honestly, those taste even better.
No regrets.
Ingredients
- Butter makes the cookies rich, soft, and a little melt-in-your-mouth.
- Sugar brings sweetness and helps those edges get lightly crisp.
- The egg holds everything together so the dough twists without crumbling.
- Vanilla gives cozy bakery flavor, not just straight-up mint.
- Peppermint extract is the candy cane vibe, so don’t go wild.
- Flour gives the cookies their shape and that classic tender bite.
- Baking powder adds a tiny lift, keeping them from feeling too dense.
- Salt keeps the sweetness in check.
Basically, it makes everything taste better.
- Red gel coloring gives those retro stripes without watering down the dough.
- Plus, sanding sugar adds sparkle and a fun little crunch on top.
Ingredient Quantities
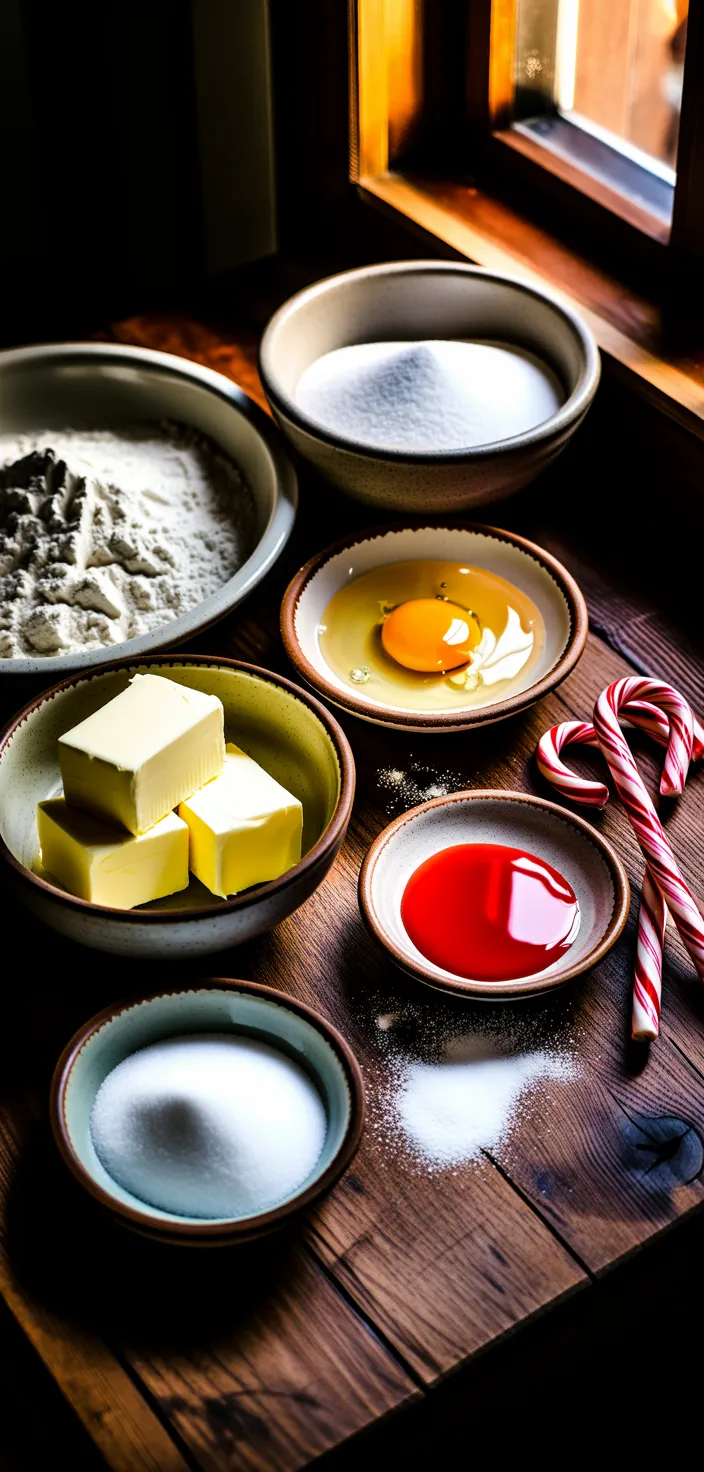
- 1 cup (226 g) unsalted butter, softened
- 1 cup (200 g) granulated sugar
- 1 large egg
- 1 1/2 teaspoons vanilla extract
- 1/2 teaspoon peppermint extract
- 2 1/2 cups (312 g) all purpose flour
- 1/2 teaspoon baking powder
- 1/4 teaspoon fine salt
- Red gel food coloring, 1 to 2 teaspoons depending on desired intensity
- Optional: extra granulated or sanding sugar for sprinkling
How to Make this
1. Preheat oven to 350°F (175°C) and line baking sheets with parchment paper or silicone mats.
2. In a large bowl cream 1 cup (226 g) softened unsalted butter and 1 cup (200 g) granulated sugar until light and fluffy, about 2 to 3 minutes.
3. Add 1 large egg, 1 1/2 teaspoons vanilla extract, and 1/2 teaspoon peppermint extract; beat until fully incorporated.
4. In a separate bowl whisk together 2 1/2 cups (312 g) all purpose flour, 1/2 teaspoon baking powder, and 1/4 teaspoon fine salt.
5. Gradually add the dry ingredients to the wet mixture and mix until a soft dough forms. Divide dough into two equal portions.
6. Leave one portion plain; tint the other portion with 1 to 2 teaspoons red gel food coloring until you reach the desired intensity, kneading gently until color is even.
7. Roll each colored and plain dough portion into long ropes about 3/4 inch thick. Place a red rope and a white rope side by side, press lightly, and twist them together; shape each twisted rope into a candy cane by curling one end.
8. Place shaped cookies on the prepared baking sheets about 1 inch apart. If desired, sprinkle with extra granulated or sanding sugar.
9. Bake 10 to 12 minutes until edges are set and bottoms are lightly golden. Allow cookies to cool on the baking sheet for 5 minutes, then transfer to a wire rack to cool completely.
Equipment Needed
1. Oven and baking sheets lined with parchment paper or silicone mats
2. Large mixing bowl and medium mixing bowl
3. Electric mixer or stand mixer with paddle attachment
4. Rubber spatula and wooden spoon
5. Measuring cups and spoons and kitchen scale
6. Dough scraper or bench scraper
7. Rolling pin
8. Wire cooling rack
9. Small bowl and spoon for food coloring and peppermint extract mixing
10. Cookie scoop or knife for dividing dough
FAQ
These Retro Candy Cane Cookies Are A Fun Family Baking Project Recipe Substitutions and Variations
- Butter: use equal weight of solid coconut oil for similar creaming and texture; or use stick margarine 1:1 if dairy-free option is fine.
- Granulated sugar: substitute light brown sugar 1:1 for a moister, slightly caramel flavor; or use coconut sugar 1:1 but expect a darker color and deeper flavor.
- Egg: replace with a flax “egg” for vegan baking — mix 1 tablespoon ground flaxseed with 3 tablespoons water, let sit until gelled (per 1 egg); alternatively use 1/4 cup unsweetened applesauce per egg for added moisture.
- All purpose flour: swap with a 1:1 gluten free all purpose flour blend that contains xanthan gum for similar structure; if using whole wheat pastry flour, replace cup for cup but expect a denser, nuttier cookie and possibly add 1 to 2 tablespoons extra liquid.
Pro Tips
– Chill the dough briefly if it feels too soft to handle. Ten to 20 minutes in the fridge firms it up just enough so the ropes hold their shape while you twist and curl without the color bleeding.
– Knead the red dough gently and as little as possible after adding gel color. Overworking warms the butter and can make the hue streaky or the texture tougher. Use a light touch to get an even color.
– Keep the ropes consistent in thickness for even baking. I like to use a ruler or mark the counter with a bit of flour so every cookie bakes and browns at the same rate.
– If you want really crisp edges, bake on the bottom third of the oven and check a minute or two earlier than the recipe time. For softer, more tender cookies, rotate sheets between racks halfway through and pull them out as soon as the edges set.
These Retro Candy Cane Cookies Are A Fun Family Baking Project Recipe
I can’t resist these candy cane cookies, with their cheerful red-and-white twists and sweet peppermint sparkle on every holiday cookie tray. They’re the festive little treat everyone reaches for first.
24
servings
152
kcal
Equipment: 1. Oven and baking sheets lined with parchment paper or silicone mats
2. Large mixing bowl and medium mixing bowl
3. Electric mixer or stand mixer with paddle attachment
4. Rubber spatula and wooden spoon
5. Measuring cups and spoons and kitchen scale
6. Dough scraper or bench scraper
7. Rolling pin
8. Wire cooling rack
9. Small bowl and spoon for food coloring and peppermint extract mixing
10. Cookie scoop or knife for dividing dough
Ingredients
-
1 cup (226 g) unsalted butter, softened
-
1 cup (200 g) granulated sugar
-
1 large egg
-
1 1/2 teaspoons vanilla extract
-
1/2 teaspoon peppermint extract
-
2 1/2 cups (312 g) all purpose flour
-
1/2 teaspoon baking powder
-
1/4 teaspoon fine salt
-
Red gel food coloring, 1 to 2 teaspoons depending on desired intensity
-
Optional: extra granulated or sanding sugar for sprinkling
Directions
- Preheat oven to 350°F (175°C) and line baking sheets with parchment paper or silicone mats.
- In a large bowl cream 1 cup (226 g) softened unsalted butter and 1 cup (200 g) granulated sugar until light and fluffy, about 2 to 3 minutes.
- Add 1 large egg, 1 1/2 teaspoons vanilla extract, and 1/2 teaspoon peppermint extract; beat until fully incorporated.
- In a separate bowl whisk together 2 1/2 cups (312 g) all purpose flour, 1/2 teaspoon baking powder, and 1/4 teaspoon fine salt.
- Gradually add the dry ingredients to the wet mixture and mix until a soft dough forms. Divide dough into two equal portions.
- Leave one portion plain; tint the other portion with 1 to 2 teaspoons red gel food coloring until you reach the desired intensity, kneading gently until color is even.
- Roll each colored and plain dough portion into long ropes about 3/4 inch thick. Place a red rope and a white rope side by side, press lightly, and twist them together; shape each twisted rope into a candy cane by curling one end.
- Place shaped cookies on the prepared baking sheets about 1 inch apart. If desired, sprinkle with extra granulated or sanding sugar.
- Bake 10 to 12 minutes until edges are set and bottoms are lightly golden. Allow cookies to cool on the baking sheet for 5 minutes, then transfer to a wire rack to cool completely.
Notes
- Below you’ll find my best estimate of this recipe’s nutrition facts. Treat the numbers as a guide rather than a rule—great food should nourish both body and spirit. Figures are approximate, and the website owner assumes no liability for any inaccuracies in this recipe.
Nutrition Facts
- Serving Size: 33g
- Total number of serves: 24
- Calories: 152kcal
- Fat: 8.04g
- Saturated Fat: 4.92g
- Trans Fat: 0.2g
- Polyunsaturated: 0.33g
- Monounsaturated: 2.1g
- Cholesterol: 28mg
- Sodium: 34mg
- Potassium: 19mg
- Carbohydrates: 18.2g
- Fiber: 0.44g
- Sugar: 8.4g
- Protein: 1.63g
- Vitamin A: 75IU
- Vitamin C: 0mg
- Calcium: 5.4mg
- Iron: 0.2mg